Sprayers
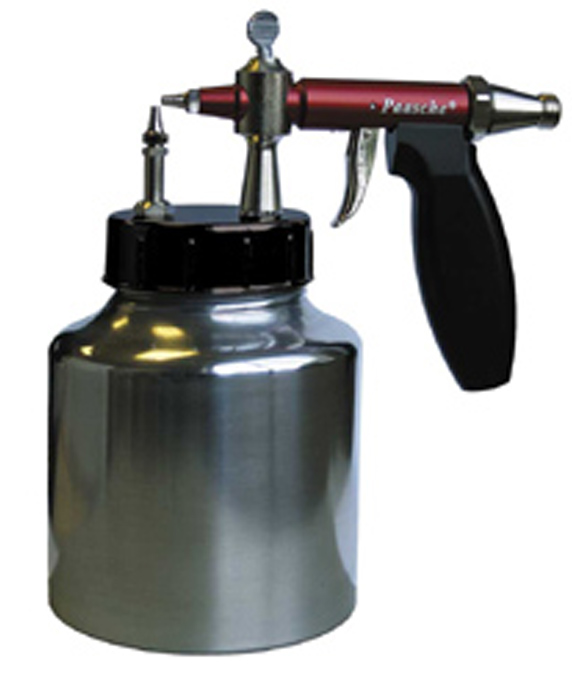
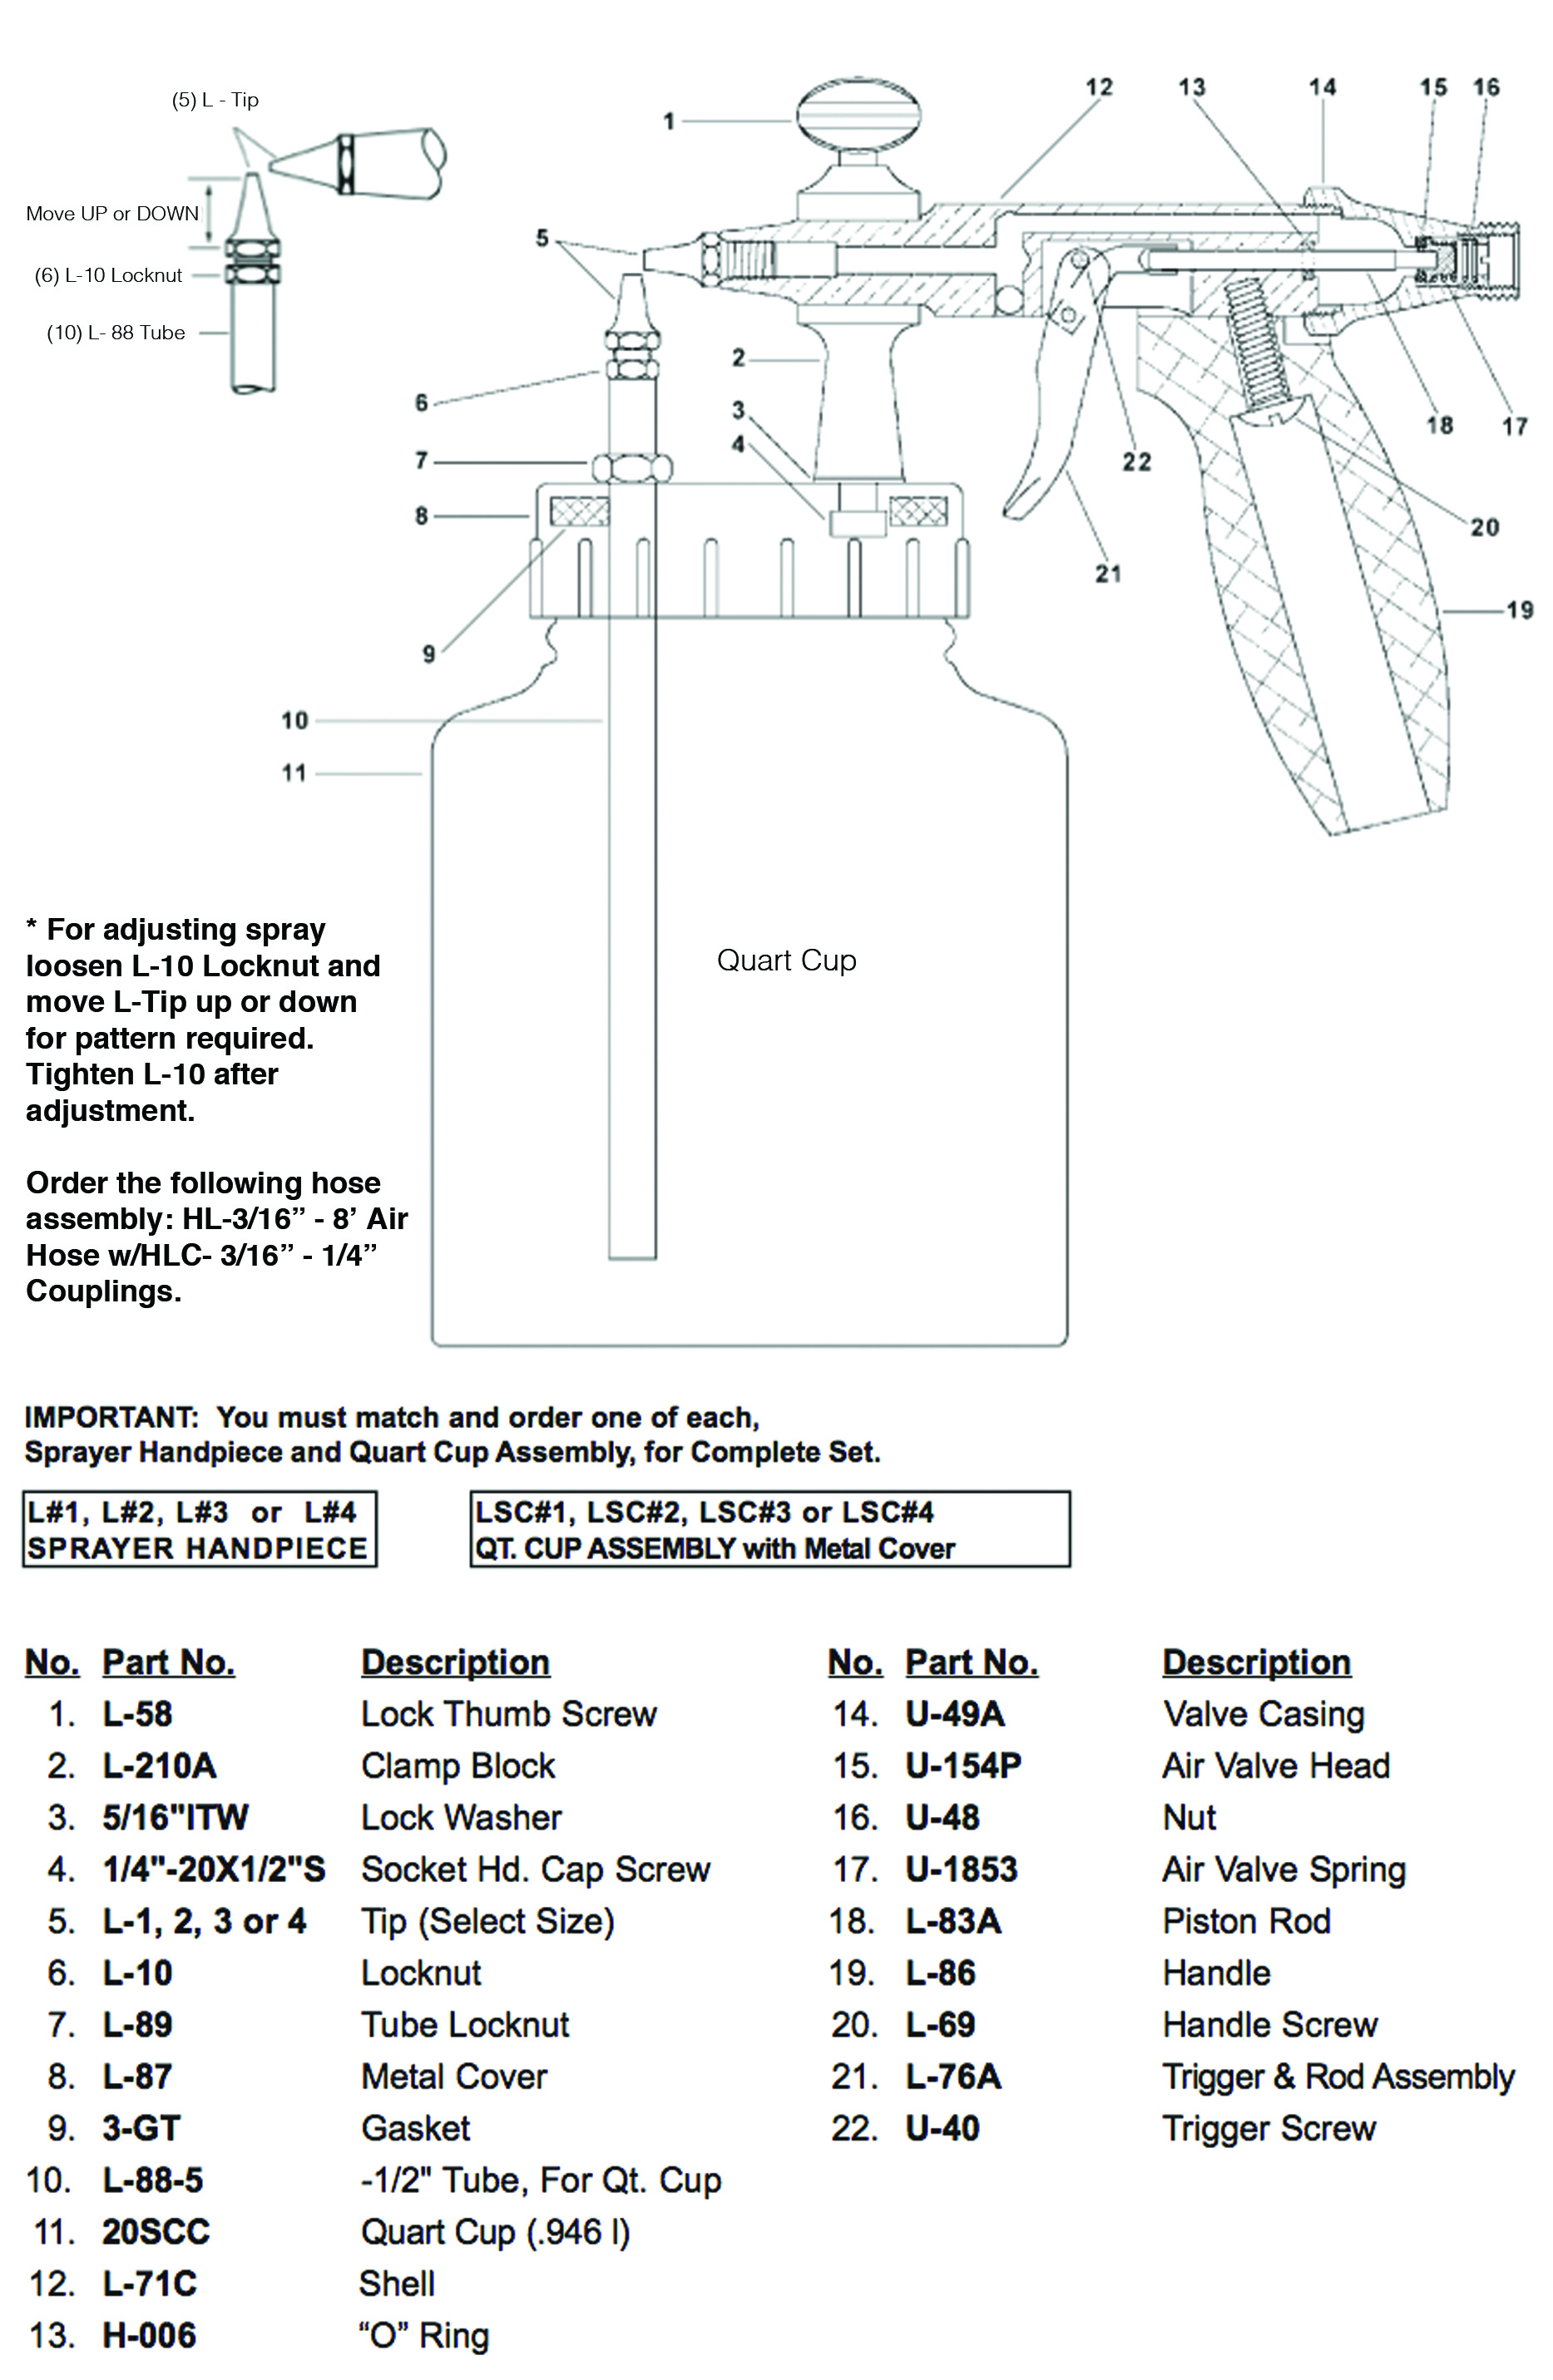
Paasche L#1
Paasche provides the largest selection of Airbrush models, Industrial sprayers and support equipment worldwide. Using only the highest quality materials in combination with the tightest quality control, Paasche products are unequalled by any other manufacturer in the world! Each unit is carefully assembled, individually inspected and finally tested in actual use by highly skilled craftsmen to meet Paashe’s high standard of excellent performance. This sprayer is ideal for foundries who wish to apply core and mold sprays, lacquers, varnishes, heavy glazes and paints. It is built in the USA and is constructed of Metal, and durable internal parts suitable for use with the solvents and waxy organics often used in foundry core and mold solutions. Available in four tip sizes for light to heavier fluids. Many other optional spray fittings, high-quality spraying equipment and accessories are also available through Smelko Foundry Products. Please inquire for more details. L – Sprayer Handpiece and LSC Qt. Cup Assembly with Metal Cover Note: Must be ordered together in matching sizes.
Use HL – 3/16” air hose.
For a complete unit, Handpiece and Quart Cup Assembly, order one size of each:
L- Sprayer components
Sizes must be matched for L & L-SC L#1, L#2, L#3, or L#4 Sprayer Handpiece
Shipping weight: 14oz. (397g)
L-SC#1, L-SC#2. L-SC#3, L-SC#4 Quart Metal Cup Assembly 32oz. (0.946 l) 1/2 Pint Cup/Screw Cover 8oz. (0.237 l)
Shipping weight: 1 lb. 6oz (624g)
Applications
The Paasche “L” Sprayer has a wide variety of uses in applying liquids of varied consistency. It is an ideal siphon type sprayer for painting small items. It will handle paints, varnishes, bronzes, lacquers, oils, cleaning solutions, disinfectants, foundry mold compounds, etc.. It is one of the easiest sprayers to use and is well constructed and simple to operate with no complicated adjustments.
Air Supply
Air pressure may range from 15 to 50 lbs., depending on the material used and the type of work to be done. 1. Stipple and granulated effects require 15 to 25 lbs. air pressure depending upon consistency of material used. 2. Air capacity of tips range from 1/2 to 6 C.F.M. @ 50 PSI depending on the size of tip and the amount of air pressure used.
Interchangeable Tips
Four sizes of air and fluid tips are available. The “L” Sprayer is normally supplied with an L-2 Tip unless otherwise specified.
1. For average use, the fluid tip should be adjusted to the center of the air tip when “L” Sprayer is assembled.
2. Forfineratomizationandsmallersprayturnfluidtipbelow center of air stream.
3. Afterproperadjustmentismade,theL-10Locknutshould be tightened so that ad justment will not change.
Connections
Before connecting air hose to air inlet at the back of handpiece, blow out the hose to remove any accumulation of dirt or foreign matter.
1. Air connection is 1/4″ pipe thread. Either 3/16″ or 1/4″ inside diameter air hose with 1/4″ couplings should be used.
Operations
The “L” Sprayer Handpiece should be inserted into L-210 Clamp Block to the extreme forward position and locked by tightening L- 58 Lock Thumb Screw.
1. Material should be mixed thoroughly to slightly lighter consistency than recommended for ordinary sprayers.
2. Materials should be strained through a cloth or wire mesh strainer before filling cup.
3. To operate sprayer, pull back on the trigger.
4. Adjust fluid tip to give size of spray as explained above.
5. Before beginning to paint, the operator should practice spraying to acquire familiarity with the sprayer and control of spray.
6. To insure uniform application apply as light a coat as possible, increasing the thickness with additional thin layers of paint.
7. Each stroke should blend uniformly into the previous stroke without runs or sags.
8. Spray full length of object to be coated releasing trigger at the end of each stroke.
9. For average work the tip of the sprayer should be held 3 to 6 inches from the surface being painted.
Finish
A smooth finish is assured when the spray is properly adjusted and the operator has acquired control of its application.
1. A rough or stipple finish is caused by air pressure that is too low or restricted flow of air.
2. Rough finish will be obtained when sprayer is held too far from the working surface.
3. A wet or sagging finish is caused by too much material being applied or material being too thin.
Care and Cleaning
Always clean the “L” Sprayer thoroughly after use.
1. The fluid tube should be cleaned with solvent siphoned through the tip after painting operation is finished.
2. Never use alkali solutions for cleaning as they will eventually destroy the aluminum parts.
3. Air and fluid tips must be kept clean at all times to insure perfect atomization and a perfect pattern.
4. Sharp instruments should not be used in cleaning tips as they will destroy or distort the openings.
Available Containers
Before placing liquid in cup make sure cup is clean and free of foreign particles. LSC is available with:
Metal Cups: • 20SCC Quart Cup W/Screw Cover (32 oz. – .946 l)
Cautions
When spraying any material, spray in a well Ventilated Area!
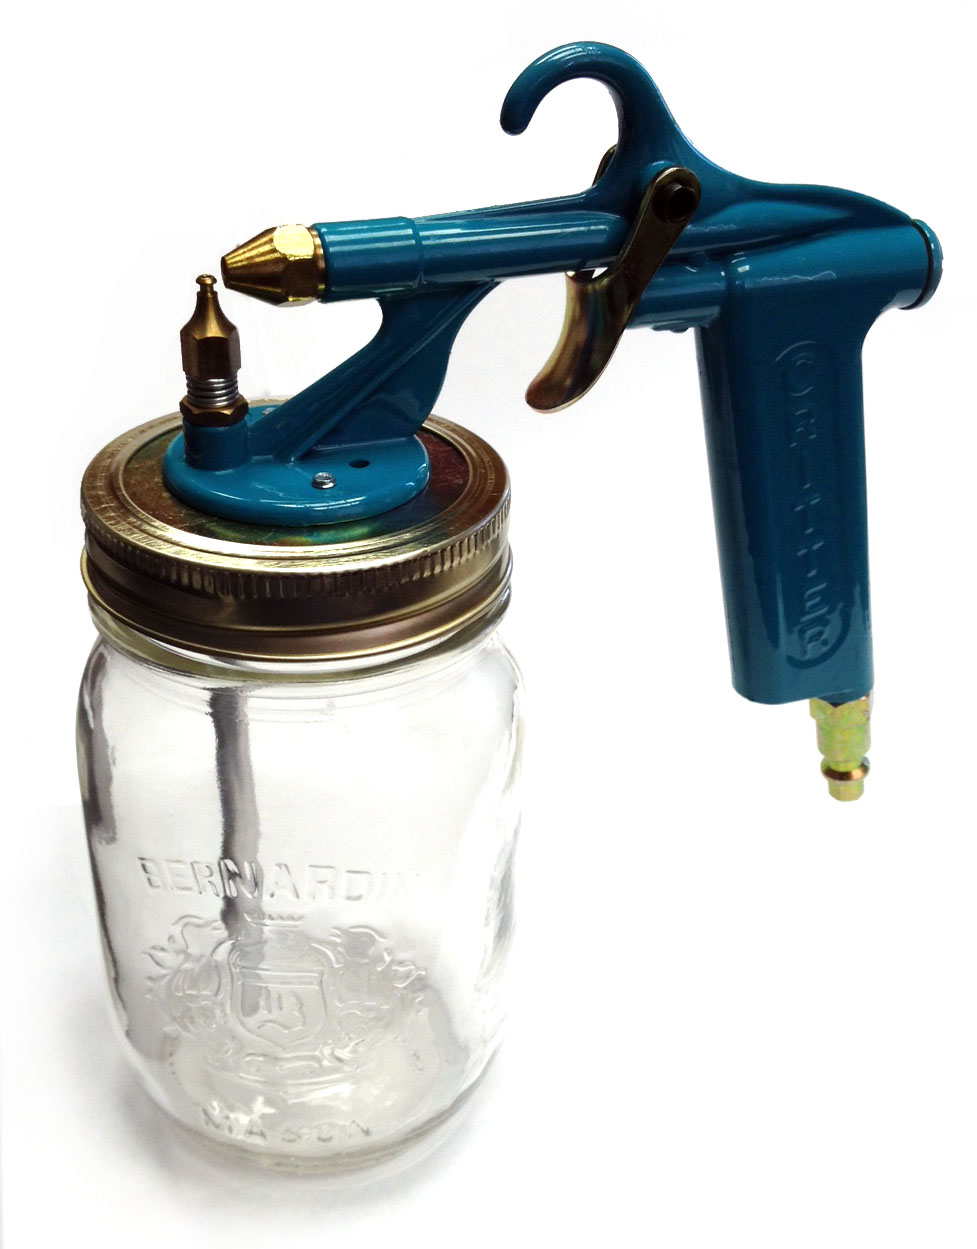
Critter Sprayer
Features
- standard 16oz mason jar – store products right in the same jar – air tight until your next project. Saving time and effort.
- Fast colour change when utilizing mason jars to store different products in.
- Easy to operate – just set air pressure at compressor and adjust liquid nozzle up or down for material control – always produces a circular pattern.
- Easy to clean – just keep liquid tube and nozzle clean ( only air passes through the gun)
- Adaptable to other containers
- Spray Foundry Partings, Release Agents, most Stains, Lacquers, Latex paints and water passed finishes at 30 lbs. psi.
- sprays contact cements for laminating and other gluing projects
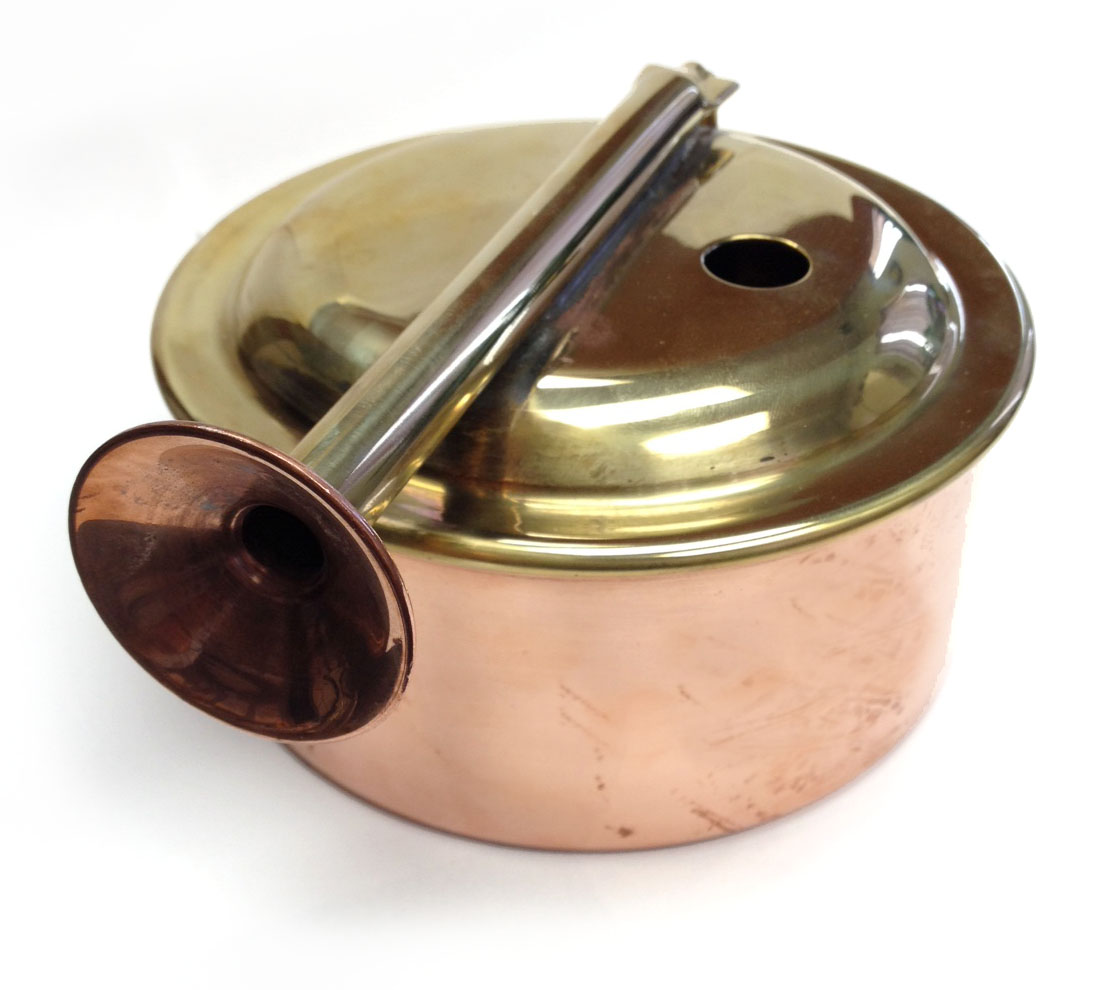
Brass Sprayer
Long time favourite in every foundry. These ‘bugle’ sprayers are suitable for spraying all foundry partings, mold releases and core/mold coatings.
Available in ‘pint’ and ‘quart’ sizes.
Fill your liquid in through the filling hole in the top, then simply run your air nozzle (blow gun) through the bugle , and spray.
You may also be interested in looking at our rubber air nozzles.